General OnBase Best Practices
Basic Contract Know-How
- All contracts that need to be signed by the CFO, Michael Papadakis, need to be processed through OnBase. Please collect all other OSU signatures before uploading the agreement into OnBase.
- If you do not have a specific signature delegation from the Office of Business & Finance – even if it’s a clickthrough agreement – you don’t have authority to sign for the University. Signing agreements without proper authority could make you personally liable. If ever in doubt, please contact Kendra Baumann, baumann.91@osu.edu.
- When processing a new agreement, you should email the contract to an attorney prior to entering into OnBase. If you have not worked with Legal Affairs before, or do not know which attorney should review, please contact Legal Affairs at 614- 292-0611 or reach out to Kendra Baumann or Catie Near.
- All fully-executed agreements must be uploaded to OnBase. Failure to comply could result in audit findings.
- We no longer send back wet signature copies unless specifically asked to return them to the department in the “Handling Instructions” field in OnBase.
- The department is responsible for retaining copies of their contracts. University retention for contracts is the life of the contract + 8 years.
- Enter each contract into OnBase separately.
- Never enter contracts with restricted information into OnBase (i.e. Social Security numbers). You may enter a redacted or blank copy, and send a complete version to B&F for signature. Please communicate with the reviewing attorney and B&F when doing this.
Best Practices for Naming and Data Entry in OnBase
- Name Documents to reflect the parties involved in the agreement or other distinguishing characteristics i.e. “Goodwill Custodial Serivices Agreement FY17” vs. “Contract” or “Fully Executed” or “Agreement”. This will be helpful to you and your successors in the department when you search for agreements later.
- Standardize Names or have a naming convention: If you have multiple agreements with a vendor, or similar documents, adopt a naming convention i.e. “Facilities Use Signature Delegation – Baumann FY17” or “Custodial Services Agreement – Goodwill FY17.”
- Enter the information into the New Form as completely and accurately as you can; this will help you and your successors down the road when searching for an agreement. It will also help us get your contract in the right hands faster.
- Standardize the names of vendors and avoid using acronyms i.e. “ODH” should be entered as “Ohio Department of Health.”
- Process agreements in a timely fashion: If you know an agreement has a deadline, give Legal and B&F as much time as possible to review, as they may request edits. This helps ensure your agreement gets processed swiftly. Please note, the standard turnaround time for review and approval is typically two weeks. However, depending on available staff and complexity of the agreement, it may take additional time to finalize. Please be conscientious.
- Always upload the counter-signed copy, and approve all contracts out of your queue in a timely manner: From a legal standpoint, a contract that is not signed by both parties could be challenged. Make sure you get the other party to return a signed copy. Remember to upload the fully-signed version to OnBase, and/or approve it when the email notification comes back from B&F that they have signed the agreement (See User Guide for instructions).
- Crosstrain: Make sure that there are approvers and initiators to cover in case someone is on vacation or off during the holidays. Small departments can share approvers with other departments within their college or reporting hierarchy to facilitate this.
Errors, Troubleshooting and Other Important Things to Know:
- OnBase works best with Chrome or Firefox. Safari and some versions of Internet Explorer will work with this latest update, but there may be errors. (Note: if you use a Mac try Safari).
- If you keep getting an error, especially when uploading documents, first try erasing your internet queue (i.e. cookies, history, etc.). This error occasionally occurs when the internet attempts to download multiple items at the same time. Erasing your internet queue should fix it.
- NEVER use the “Import” function in OnBase to process a new contract. The “Import” function does not add your agreement to a workflow, so it disappears, and you will have to re-upload. You must create a “New Form” for your contract to be processed correctly and in a timely manner.
- You cannot delete documents from OnBase. Please contact Catie Near or Kendra Baumann if a deletion is needed and please let us know why.
- If, when logging into your OnBase account, it says it is locked or you receive an error,
please email Catie Near at Near.8@osu.edu.
For any questions or further assistance, including creating or changing OnBase accounts, please contact Kendra Baumann (Baumann.91@osu.edu) or Catie Near (Near.8@osu.edu) with the Office of Legal Affairs (614-292-0611).
How to Login to OnBase:
- From the Home screen: login at https://edm.osu.edu/AppNet/Login.aspx.
- Log into OnBase with your OSU name.# and password that you use for University business.
- BuckeyePass will appear. Authenticate using the Duo app. (We recommend the “Push” feature or the Passcode). Download the app to your mobile device for easy access.
Getting Started and Getting to the Main Menu:
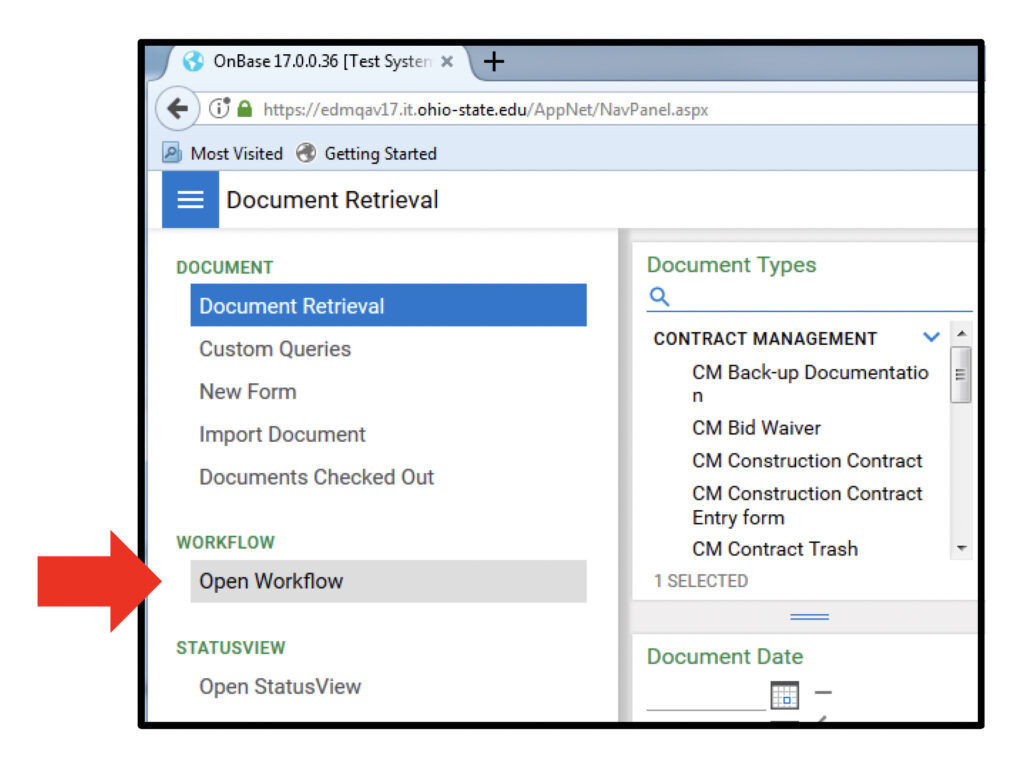
- Once logged into OnBase, you will be in the basic search feature for OnBase. OnBase has two parts, the “repository” which stores contracts once they are complete, and the “workflow” which passes contracts through the approval process. This search feature can find documents wherever they are, but is view-only. You cannot take action on a document from the search features. To take action on—or upload—a new agreement, locate the root menu on the left side of the page and click the icon (three parallel lines).
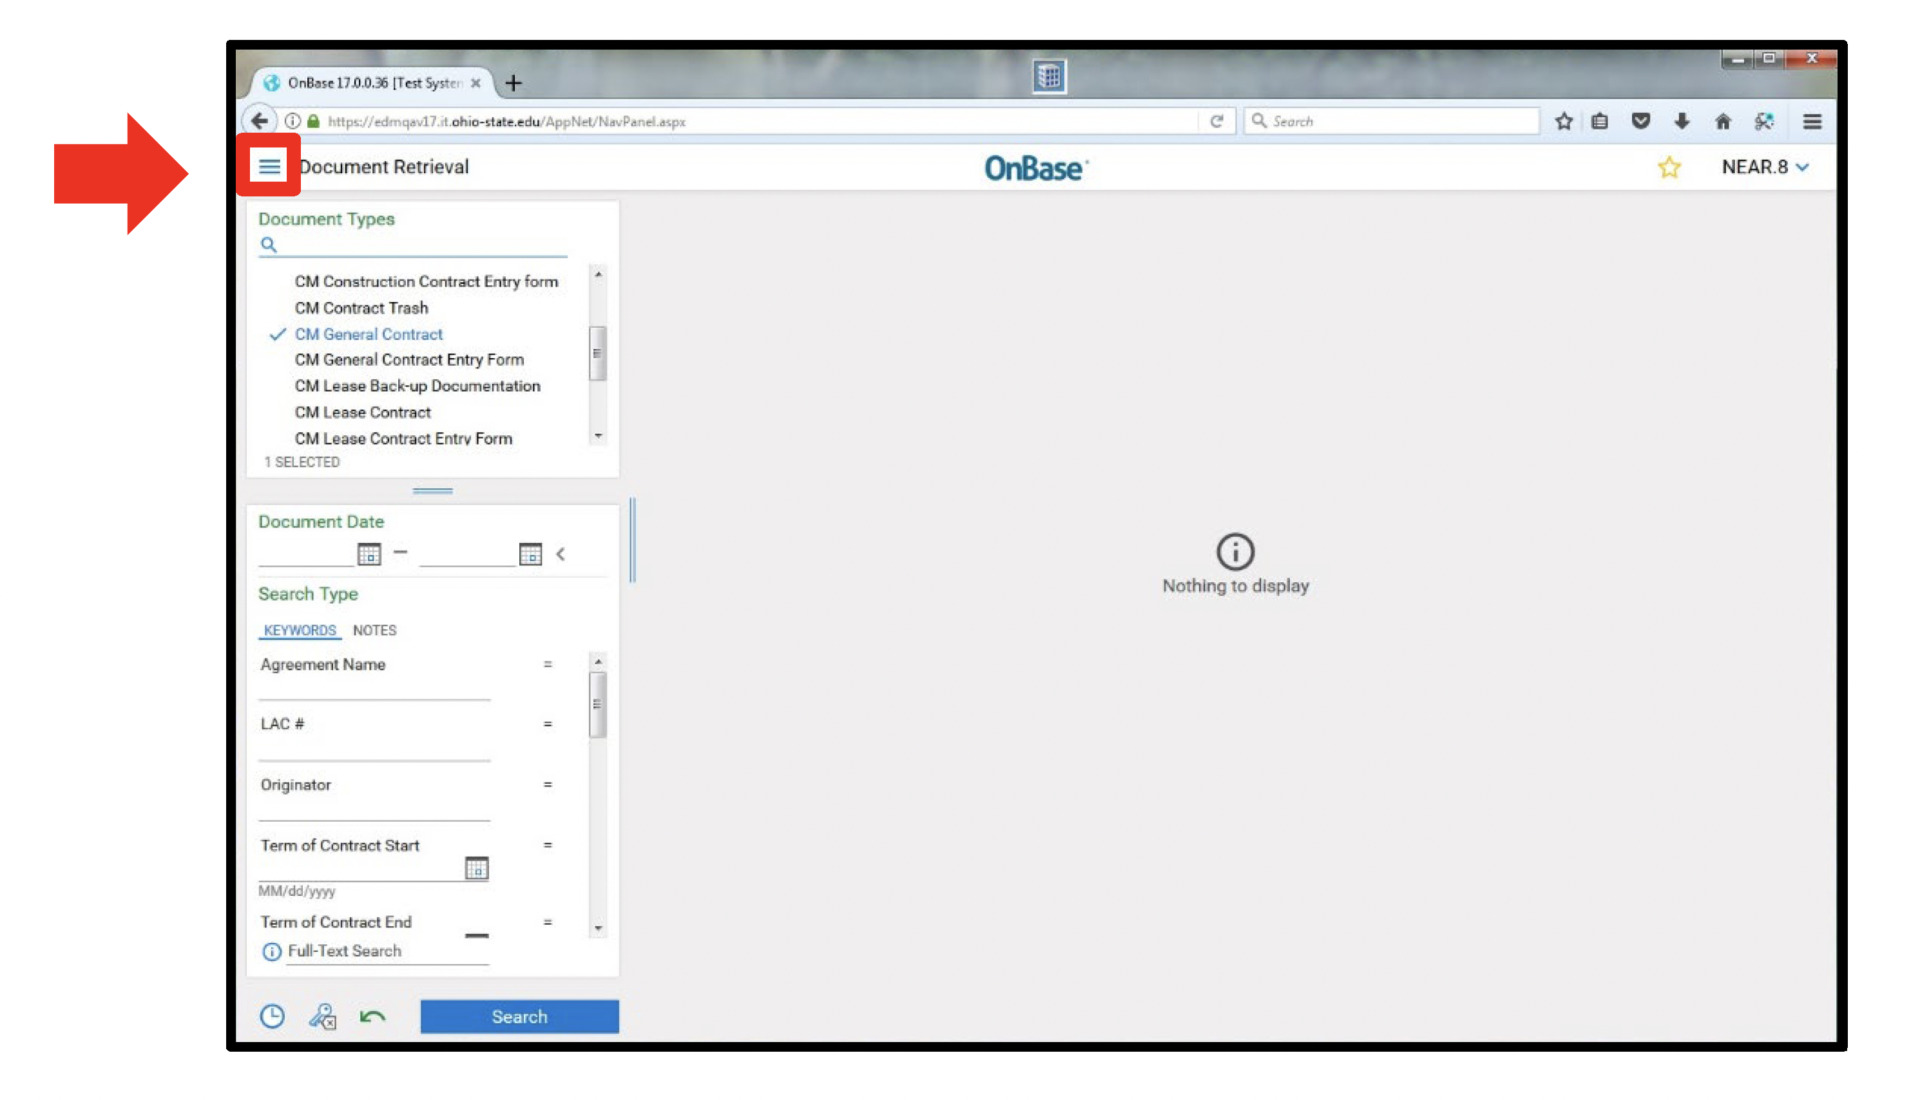
The main menu will appear on the left. The instructions for tasks will begin from this screen.
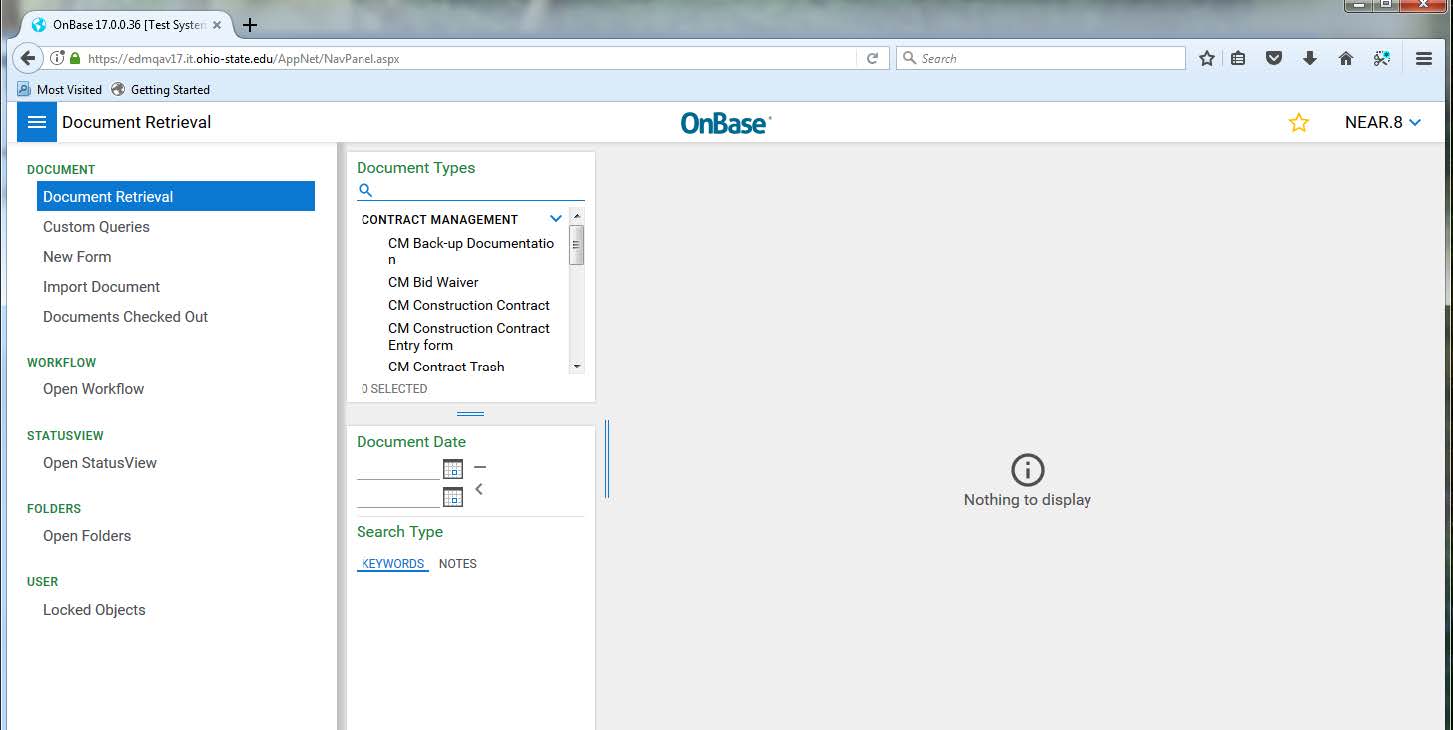
How To Add a New Contract:
- Select “New Form” from the main menu. Click on the type of Contract you wish to upload to the Portal. Most users should select “CM General Contract Entry Form”. The Form will appear in the panel to the right.
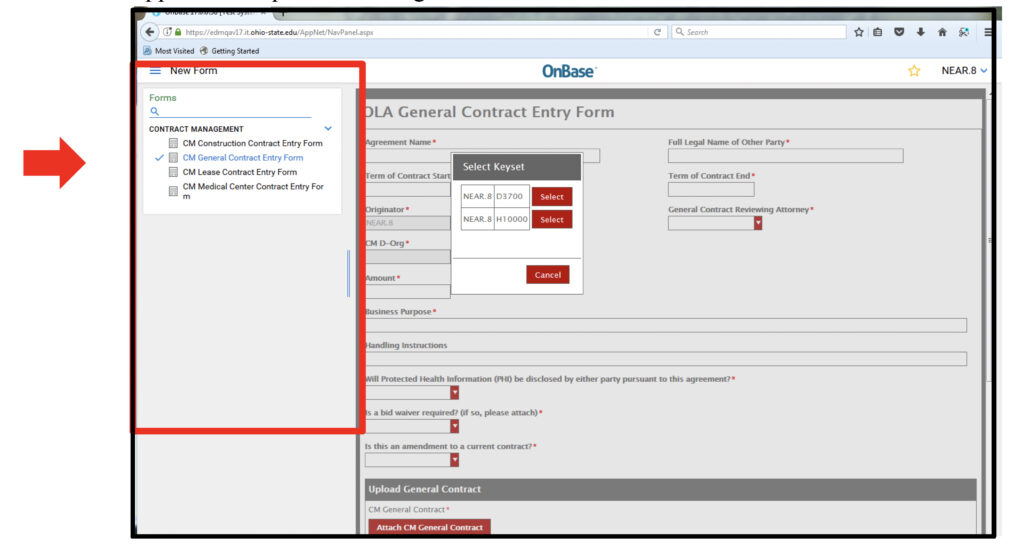
- Fill out the form. All fields with an * are required. See below for details.
- Select Keyset/CM D-Org: This is the DOrg for your organization/the contract. The D-Org will populate automatically, or, if you have access to multiple D-Orgs, a box containing each number will appear. You must pick a D-Org for your contract to route to the next approver.
- Agreement Name: Name your agreement something that reflects the content of the agreement. Please see the section in OnBase Best Practices – Best Practices for Naming and Data Entry in OnBase on page 1.
- Full Legal Name of Other Party: Enter the full legal name of the organization OSU is doing business with (i.e. The Ohio Department of Job and Family Services, The Royal Shakespeare Company, Microsoft Corporation). No abbreviations, please.
- Term of Contract Start: Enter the date the contract is set to start
- Term of Contract End: When the contract is scheduled to end.
- Originator: your name.# will auto-fill.
- Select Reviewing Attorney: Select the attorney your department is working with. Call the office of Legal Affairs if you have questions (292-0611).
- Amount: must be numerical. You can enter $0 for contracts that do not involve University funds.
- Business Purpose: Use this space to briefly explain both the reason OSU is entering into this agreement as well as anything else that needs to be known about the contract that is not covered elsewhere on the form (i.e. profits, grants involved, departments sharing expenditures, etc.).
- Handling Instructions: include anything specific to the completion of this particular contract such who the contract should be returned to after signature, urgency, or if multiple original signed copies or electronic copies are needed.
- PHI: Does your contract involve the exchange of Protected Health Information? Select Yes or No from the dropdown menu.
- Bid Waiver: Select Yes or No and after the contract is added with the “Add Attachments” button, attach the bid waiver.
- Amendment: Is this an amendment to a current contract? Answer yes or no and, if known, fill in the LAC# of the original contract.
- Click on the red “Attach CM General Contract” button to upload the contract to the Portal. This should consist of a single document that requires review and signature.
- Click on the red “Attach CM Back-up Documentation” button to upload any backup documentation (emails, spreadsheets, last year’s version of the contract, etc.) to OnBase. This may include multiple documents.
- Check the three boxes at the end if you have met the terms.
- Click “Send to Workflow” once you have completed the form.
- Click the “Attach CM General Contract” button and upload your document. Please only upload one contract, combined into one file, for review and signature. Every contract should be entered separately into OnBase.
- Click the “Attach CM Back-up Documentation” button and upload any supporting documentation required (i.e. emails, spreadsheets, underlying agreements, etc.). You may upload multiple separate documents if necessary. If your agreement is an amendment or a renewal, you must upload the underlying agreement. Note: this step is optional for contracts that are not renewals. Not every contract requires documentation.
- Click the “Send to Workflow” button. It will ask you if you would like to submit another contract. If you have another contract to upload, click “Yes” if you do not, click no.
- You are finished, but if you would like to confirm the LAC# for tracking purposes, see the next section.
- You will get an email when your contract has been signed. Go to How to Upload a Signature Page or Give Final Approval to a Signed for the steps to take after your agreement has been signed.
How to Find the LAC# or Check the Status of a Pending Contract (Using a “Custom Queries” Search)
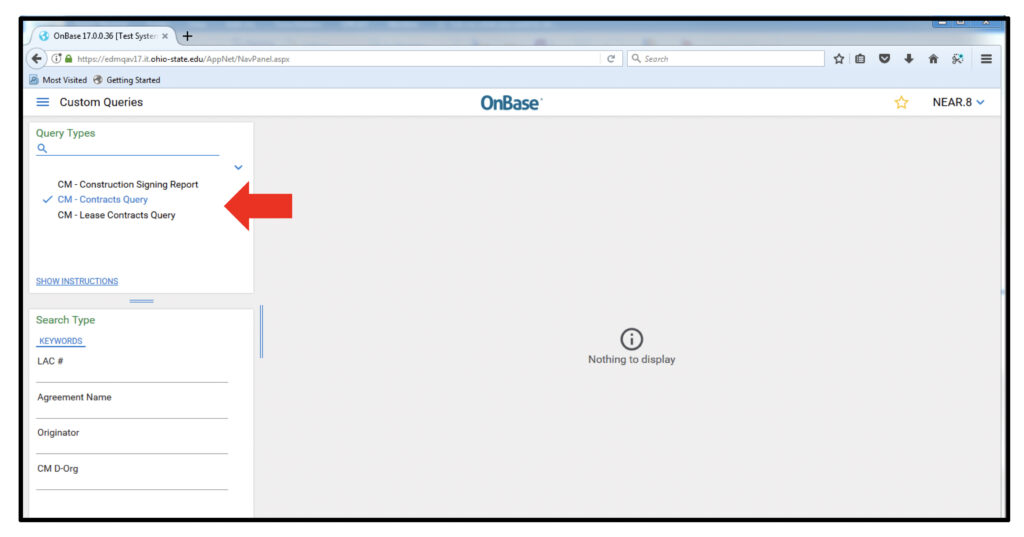
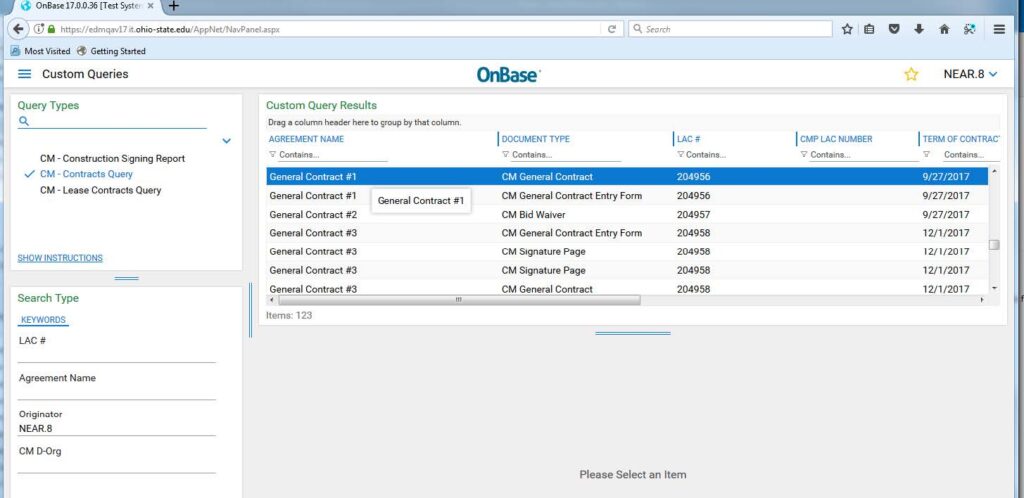
- From the main menu, click on “Custom Queries.” The screen below will appear.
- Click on “Contracts Query” and enter in identifying information and hit ENTER or the SEARCH button. You can use the * to search (i.e. entering Brutus* will bring up all contracts you can see entered by Brutus, or entering Buckeye in the Agreement Name field will bring up all contracts with “Buckeye” in the title). Note: when entering D-Org, enter it in the format of D3700 or D37*. It will only bring up the contracts you have permission to view.
- Based on your search criteria, documents will appear on the right.
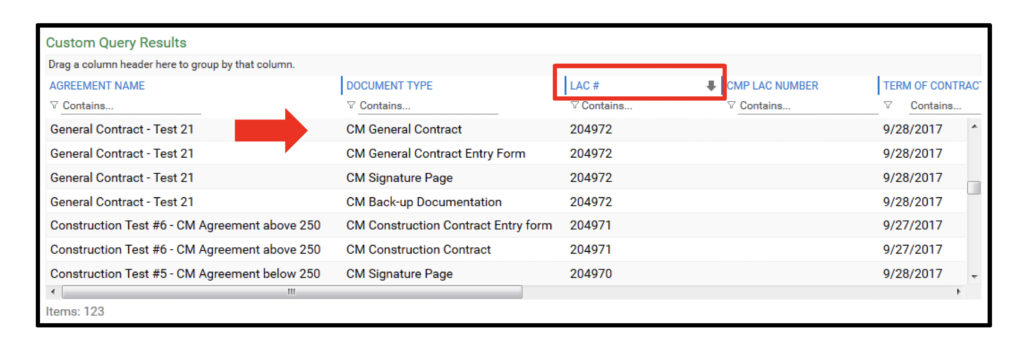
- Find your contract. To bring your most recent items to the top, sort by LAC# (click twice on the LAC# column to sort newest to oldest). You will see multiple “pieces” of the contract listed under each LAC#. They are the documents that you uploaded.
- To check the status find the piece called “General Contract” under document type.
- To check the status of the contract, click on the item to select it, then right click on it and select “History.”
- A pop-up will appear with several tabs (see illustration below).
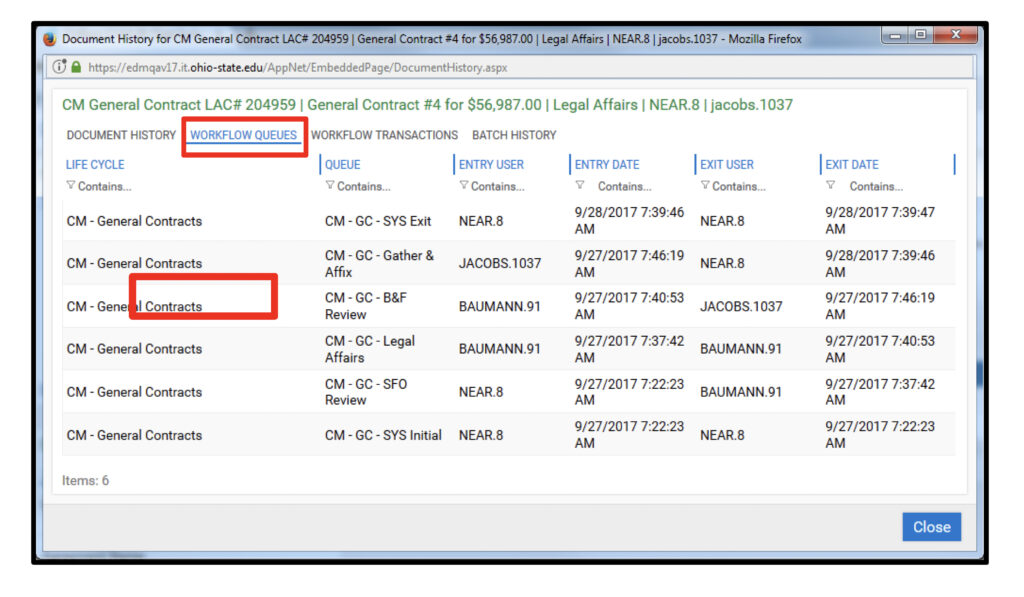
Document History shows who has reviewed the document, etc. while the “Workflow Queues” tab shows where the document is in the workflow process. Note: the document history is sorted with the most recent action listed on top. Each line on the workflow queues tab shows when an approval occurred. SYS Exit is the last step taken by the originator to approve the contract out of the workflow and into the repository.
A Note on Custom Queries
Custom Queries is a great way to get a “whole picture” idea of a contract because it brings up all of the documents associated with a contract, but it is not always the best way to search— especially if you do not have a lot of information. See the next section for more specific or detailed searches.
Other Ways to Search for a Contract
A contract becomes an executed contract only after it has been approved by Legal, signed by Business and Finance, and the counter-signed version of the contract has been uploaded. If a search using the “Custom Query” section is too broad, you may want to limit your search fields using the “Document Retrieval” search (the first screen you seen when you login).
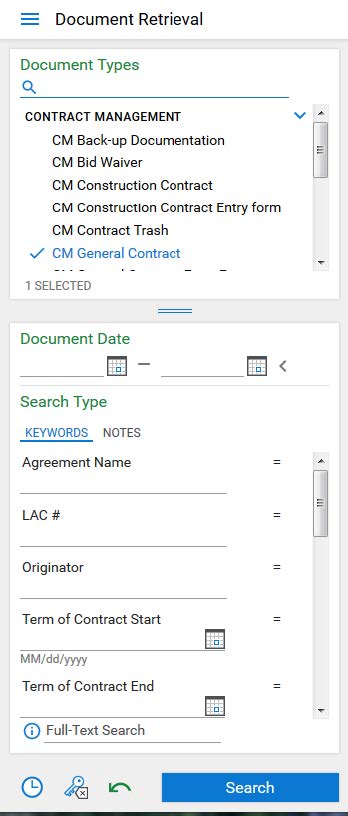
- Select a document type. Note, not all document types have the same search criteria. Most of the time, you will want to select “CM General Contract” because it has the most search options. This will bring up the unsigned contract, which will give you the LAC# and other details. If you are looking for a signed copy, select “CM Signature Page.”
- You can then search using various parameters:
- Agreement Name: Search by the Name of the Agreement
- LAC #: This is to search for LAC#s entered into OnBase.
- Originator: Search by the Name.# of the Person who Uploaded the Contract (useful for finding your own items).
- Term of Contract Start: Search by the Date the Contract was entered into.
- Term of Contract End: Date the Contract Ended
- Amount
- Business Purpose
- General Contract Reviewing Attorney
- Full Legal Name of Other Party: Search by the Name of the Entity with whom the University is doing business.
- Handling Instructions
- CMP LAC Number: Search for a contract from the Old Contract
- Portal by using the CMP LAC# (LAC_######)
- CM D-Org: Search for contracts submitted by your D-Org(s).
- You will only be able to see your own D-Orgs.
- Full-text searching may be offered at a later date.
How to Approve or Reject a Contract that is Pending in Your Queue:
Note: If a contract is in your queue, you should get an email notification. If you click the link in
the notification, it will only allow you to view that specific contract and will not work if that
contract has already moved on. If you enter OnBase by logging in independently, it will show
you everything in your queue.
- To view your queue, log into OnBase and proceed to the main menu, select “Workflow.”
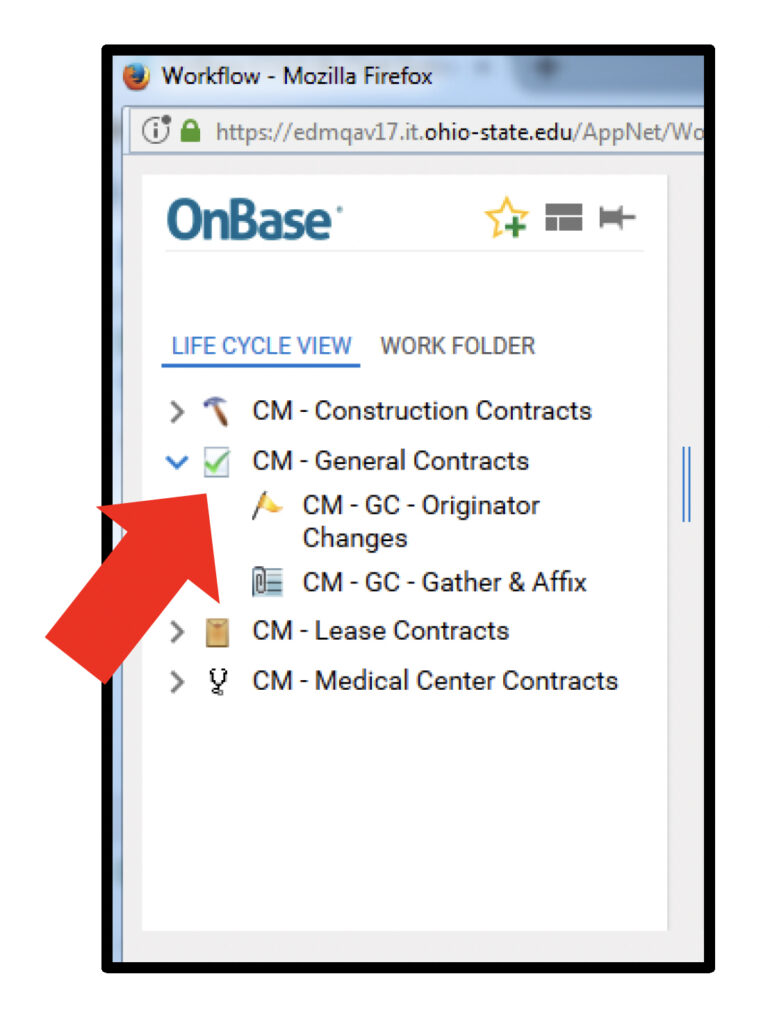
- Another work screen will pop up (if it does not, check your popup blocker). You will see the types of contracts you work with. Most of you will only see “CM-General Contracts.” Click on the + to get to the items in your workflow. Several Folders will appear below in “General Contracts.” These are your queues. For those with initiator privileges, you should see “Originator Changes” and “Gather & Affix.” For SFOs, you should see a folder marked “SFO Review.” Many of you will see all three.
- Double click on the folder that you wish to open. You will then see the contracts in that stage of your workflow in the panel to the right.
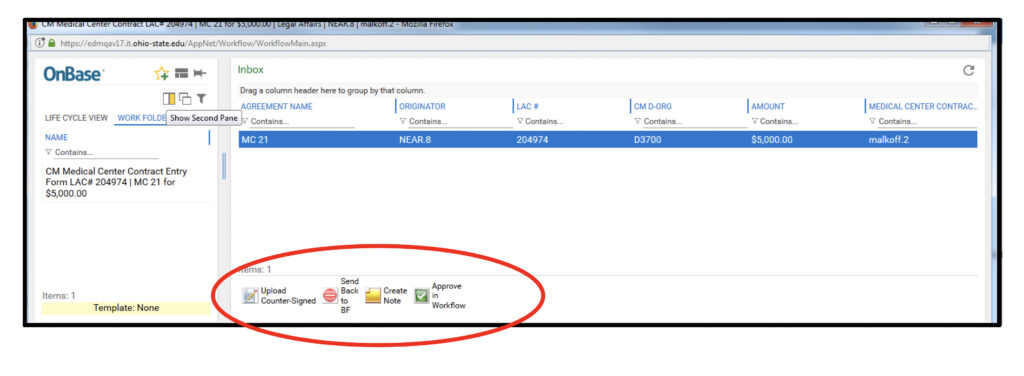
- Select the contract that you wish to view by double clicking on it (the first one on the list may try to open automatically – just close it out). You can then use the buttons on the bottom of the page to take the appropriate next step:
- Upload Counter-Signed: Only in the Gather & Affix queue, click this to upload the final signed version of a contract (if not already uploaded by B&F).
- Send Back to [the past step]: You are going to send the contract back a step. It will ask you to enter a message; please explain why you are sending it back. That message will go in an email to the last person who approved the contract.
- Approve: You acknowledge that you approve of the contract as it is and want it to proceed to the next step in the approval process.
- Approve & Add Attachments: In certain situations, you may approve of the contract but wish it to upload a new version of the contract itself. When you click this option, a new screen will pop up enabling you to upload a new signature page. If you wish to add documentation see (f) below.
- Approve in Workflow: Only in the Gather & Affix queue. By clicking this, you are acknowledging the contract as signed completely.
- Create Legal Note: Do not use this button please.
- Upload Back-up Documentation: If you have an email, spreadsheet, or support document that needs to be included with the contract please use this button to upload the document. Please do not add additional items for signature, this is for back-up documents only.
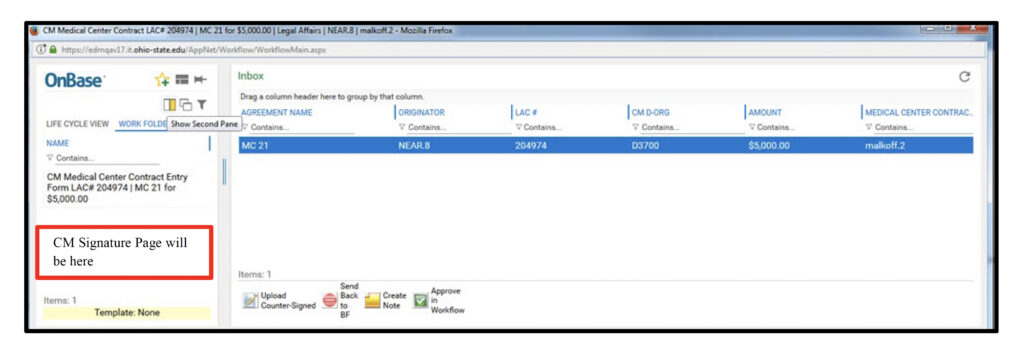
Important Note: Please note that in workflow, when you select a document the first one that
opens is the one you or your initiator uploaded. This may not be the most recent version. Please
look for items titled “Signature Page” in the workfolder to the left (replaces the folder view when
you open the document) when approving an agreement to be sure you are looking at the latest
version.
How to Upload a Signature Page or Give Final Approval to a Signed
Contract:
- From the main menu, select “Open Workflow.”
- When the new screen appears, select the “^” next to the contract type you are working with. Most of you will select CM- General Contracts. Several folders will appear, select “Gather & Affix” to upload a signature page or approve a completed contract.
- Your contracts which have been approved will appear. From here you can upload your signature pages. Select “CM Signature Page” from the work folder on the left panel to view the signed copy uploaded by B&F.
- Gather any further signatures.
- Use the buttons at the bottom to finish your contract:
- Send Back to B&F: If for some reason there has been a last-minute change, there is one last opportunity to send the contract back to workflow and make changes.
- Approve in Workflow: Do not hit this button until the fully-executed copy has been uploaded.
- Upload Signatures: Click this button to upload a counter-signed copy of the contract. It will allow you to browse out to your computer and find the location of the document, then click the icon of the piece of paper with a green arrow to upload the document into OnBase. Once your fully executed version has been uploaded, select it in the view panel, and click the “Approve in Workflow” button to dismiss it from your workflow. You will still be able to view your document using OnBase’s search features.
- Your completed documents will stay in your Gather & Affix queue until you finish
processing them. You will receive an email every 30 days for each contract that is in
your Gather & Affix queue. Please upload and approve your contracts promptly.

